I spent the last two weeks researching and making endless cassette loop tapes and this is what I learned.
Posted on March 10th, 20213/10/21
I’ve been spending a lot of time during quarantine watching folks on YouTube use tape loops and play Tascam Portastudio cassette 4-tracks like an instrument. I plan on trying to make some chords, chord progressions and stem mix tapes. And when I give up, maybe I’ll sell my new-to-me Tascam 424 mkiii to you cheap. I plan on using this in a collaborative audio project and to force myself to experiment with sound design outside of the purely digital realm. But first I’m going to need to make some tape loops.
These dudes are responsible for the rabbit hole I’m currently in.
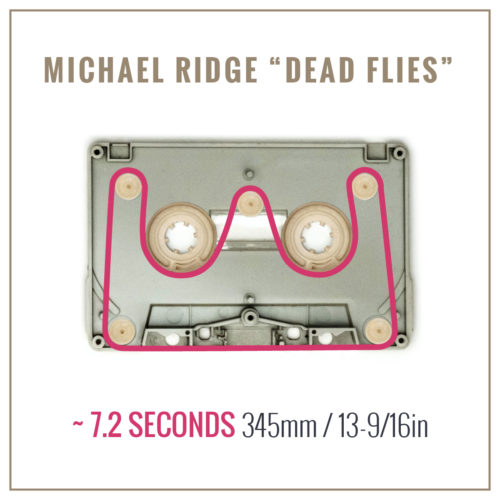
There are many styles of an endless loop tape.
Before starting, I researched the many types of loop tape designs documented on the internet. I really had no idea what I was doing when I started, but I came across a few articles and videos. The idea behind endless loop cassettes, is to create the longest loop duration while using readily available parts.
3 Basic Loop Layout Techniques
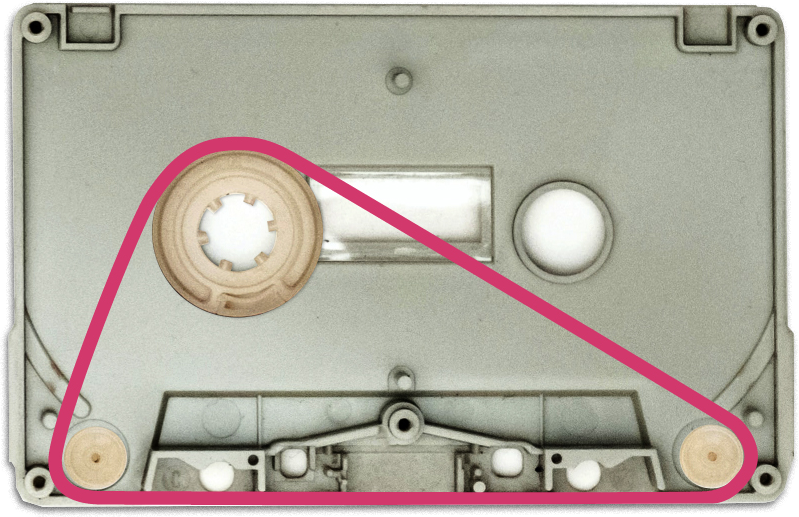
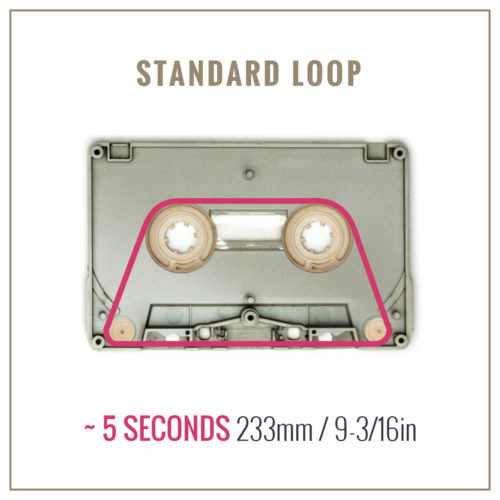
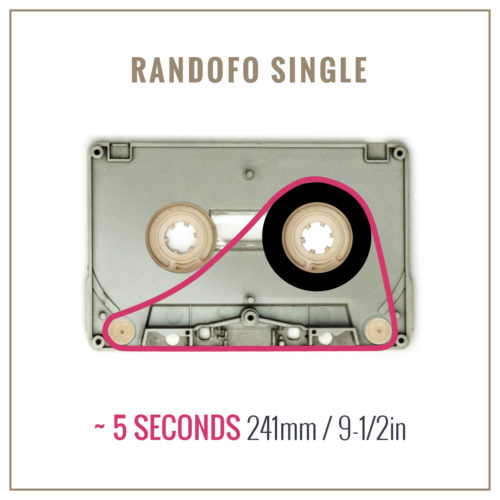
Standard Loop
~:05 seconds
My personal measurement for this type of design: 233mm (9.1875″)
This is considered the most basic type of loop and the easiest to make. I quickly made one to determine length of tape and how long the loop would be in seconds.
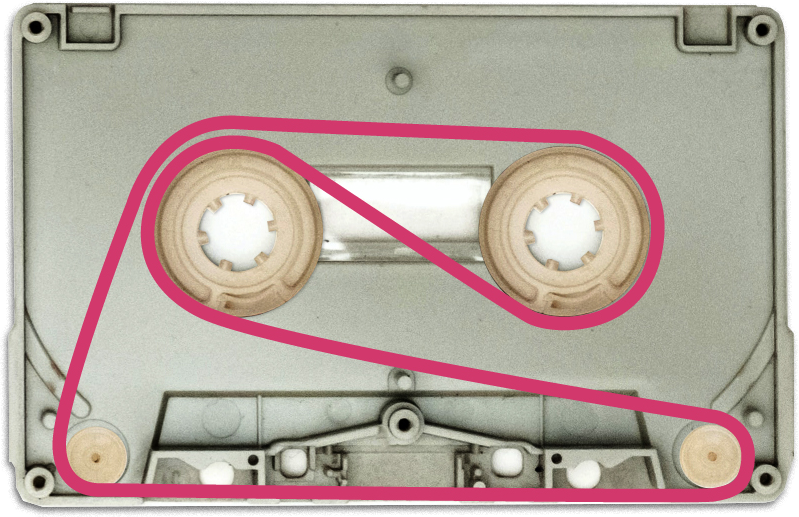
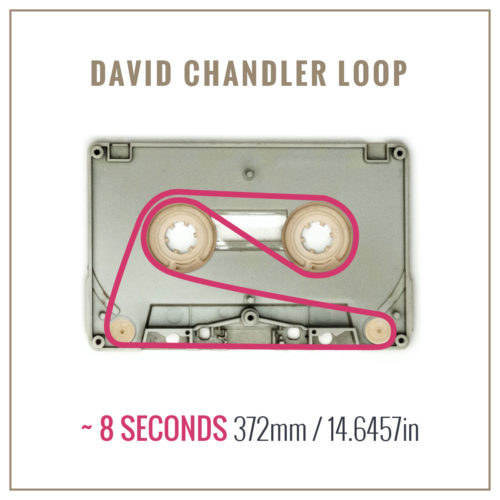
Chandler Loop
~:08 seconds
David Chandler’s measurement for this type of design: 372mm (14.6457″)
This is my favorite design, by far. It’s simple, and it requires no material, other than scotch tape, not found within the contents of a single cassette. No extra rollers, wheels or added rubber washers. It’s longer than a “Standard” or “Single Wheel” loop. I ended up making a bunch of these, reversed, with the section of tape that rubs against itself on the right, instead of left.
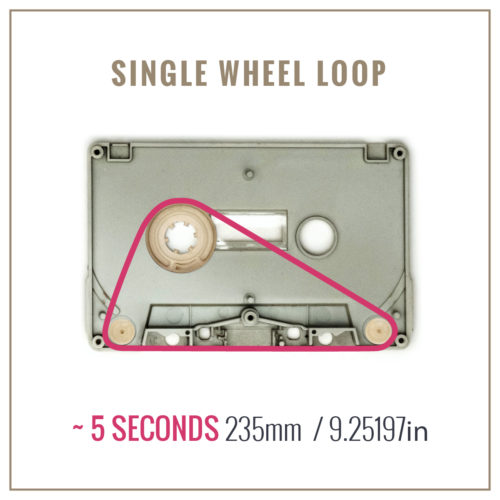
Single Wheel
~:05 seconds ~:10 seconds w/Mobius Twist
David Chandler’s measurement for this type of design: 235mm (9.25197″)
This design uses a single wheel, while discarding the other. You can also add a small “Mobius” twist in the center to allow the tape source to loop both sides of the tape, making the loop twice as long. I don’t think I would make this type of loop without using a Mobius twist, as it’s the shortest style of loop you can make – unless you need an extremely short loop.
What is a "Mobius Twist"?
A “Mobius Twist” is when you make a single twist in the tape loop. It will play what you record and then flip over and continue playing, doubling the play time. This truly only works on stereo cassette decks, and not 4-track recorders, although some have reported it creates interesting effects. The audio that plays on the second half, will sound a bit muffled, but should otherwise play.
Helpful Info About Tapes and Tape Players
At normal speed, cassettes run at 1.875 inches per second.
At high speed, cassettes runtime is about 1/4 the running time at normal speed.
Standard cassette players can play and record both sides of a cassette in stereo.
4-track cassette records consume both stereo channels, so you can only play one side.
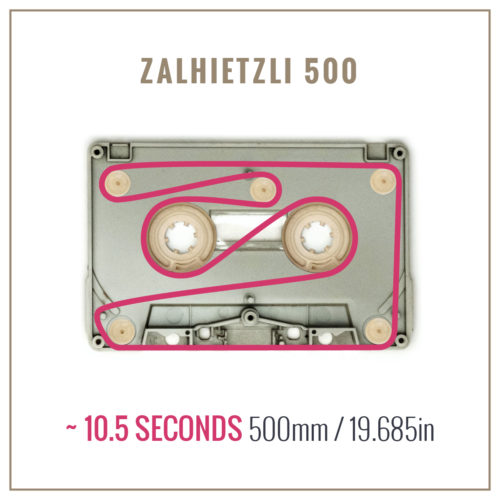
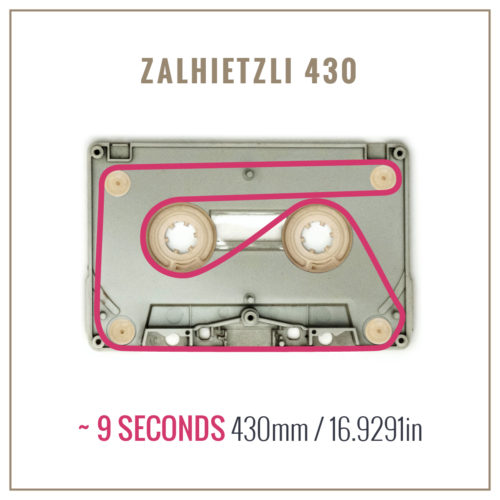
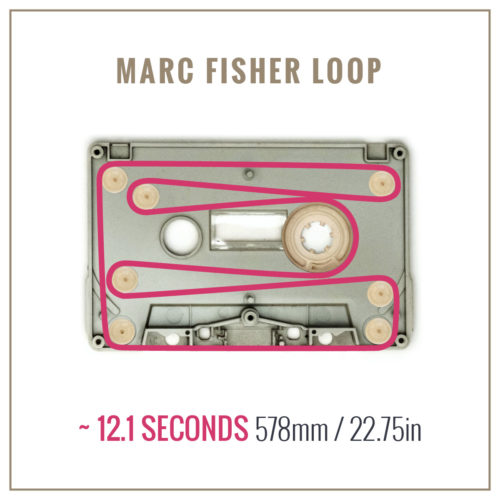
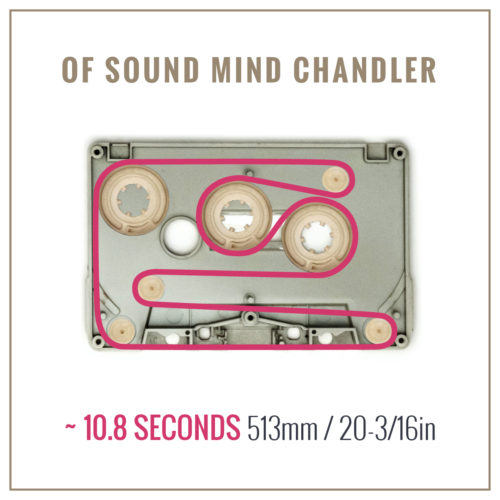
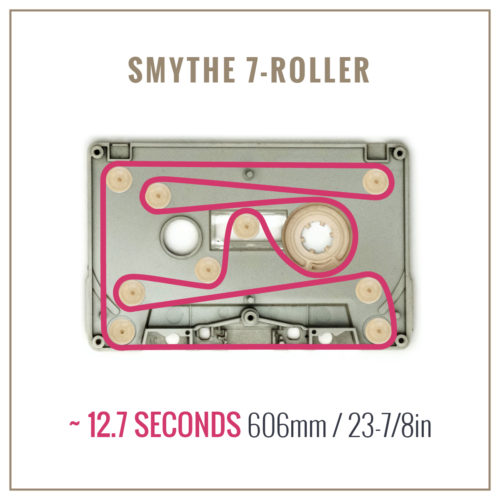
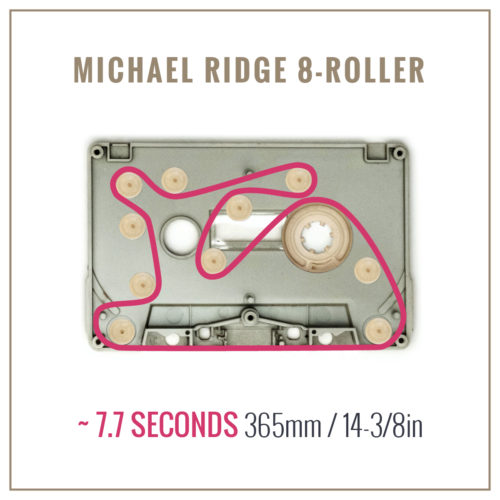
Illustrations of Standard and Modified Loops
To help visualize, I illustrated a few of the most creative loop designs I found during my research, some with extra guide rollers and supply wheels to get extra length out of your tapes. On each diagram, I’ve noted the length of tape and its duration in time when played at normal playback speed. If there was no specified length/time in the information I’ve gathered from other folks, I tried to build one and provide that helpful information.
Click thumbnail images to view larger.
I made a downloadable PDF of all these loop configurations so you can print it out and have it next to you while you work.
small screwdriver (for servicing eyeglasses or computers)
X-ACTO® blade for cutting tape (or a small pair of delicate scissors)
24″ ruler (a cork-backed ruler works well)
a few Post-it® notes
clear Scotch tape
cutting surface (I use a thin piece of cardboard)
Gorilla Glue “Gel” instant-drying glue (Super Glue® or Loctite® glue will also work, optional)
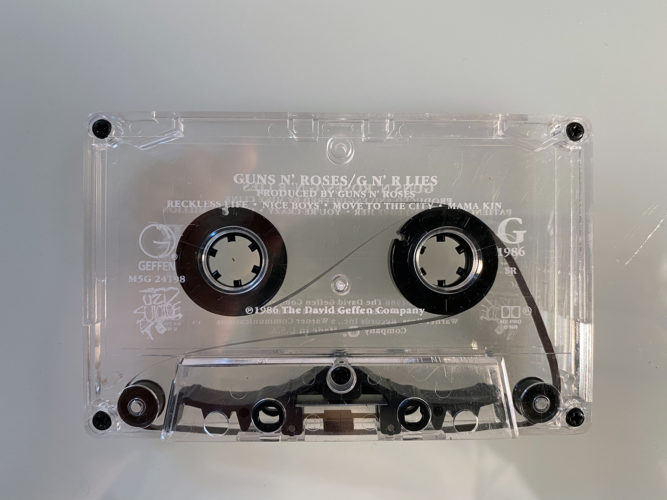
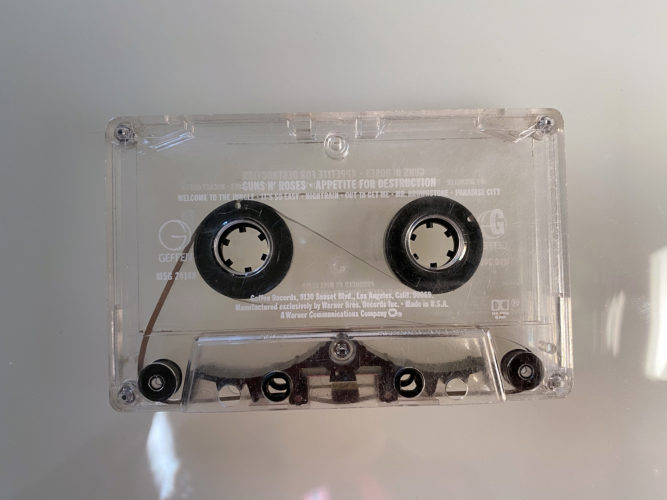
blank tape(s) -new, or used, blank or commercially replicated. It doesn’t matter. Just make sure they can be taken apart with screws. Hit your local thrift store. Value Village in Milwaukee has them half off on Fridays and weekends.
extra cassette wheels and rollers (optional) – these can be scavenged from used tapes that don’t have screws. Just bust em up with a screwdriver.
Build Instructions:
Get yourself a tape. (make sure it can be disassembled with a screwdriver.)
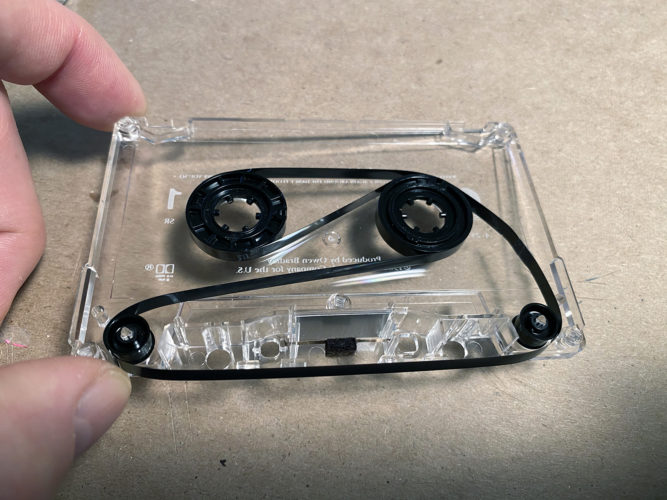
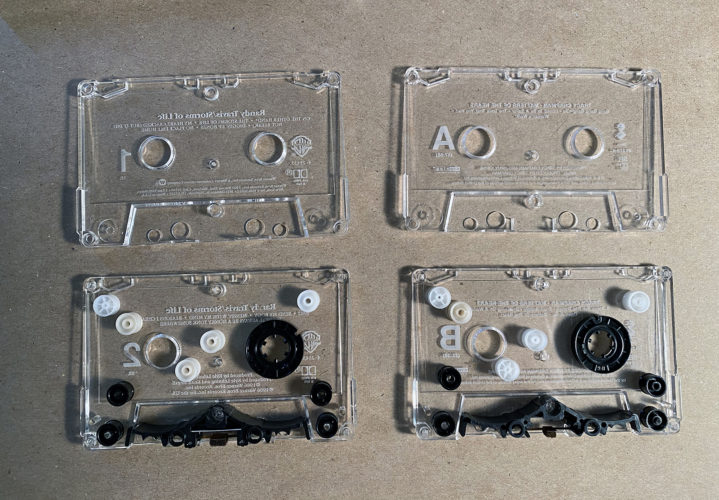
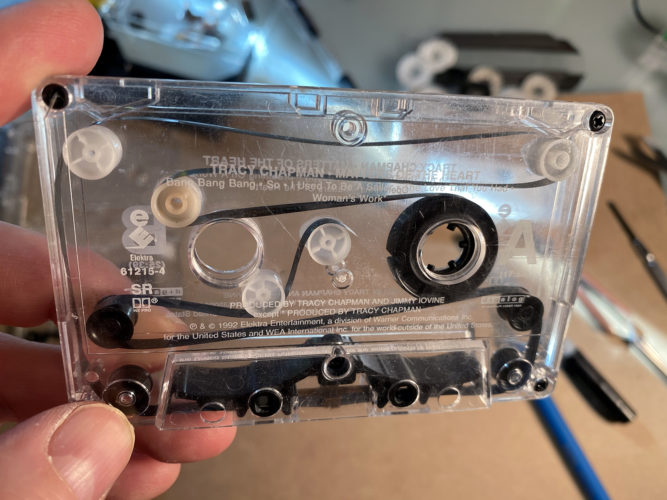
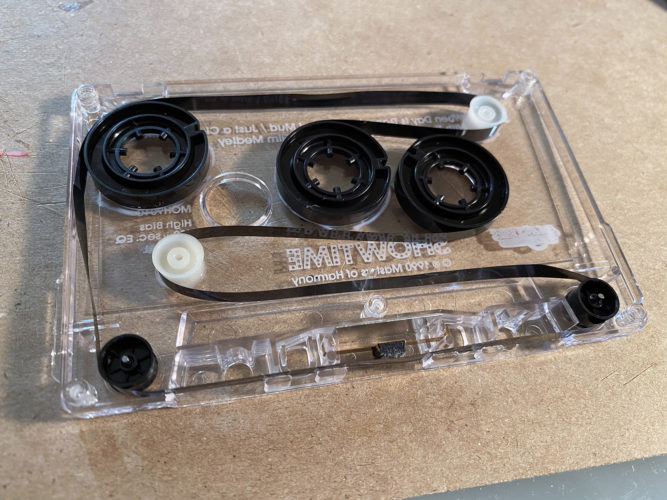
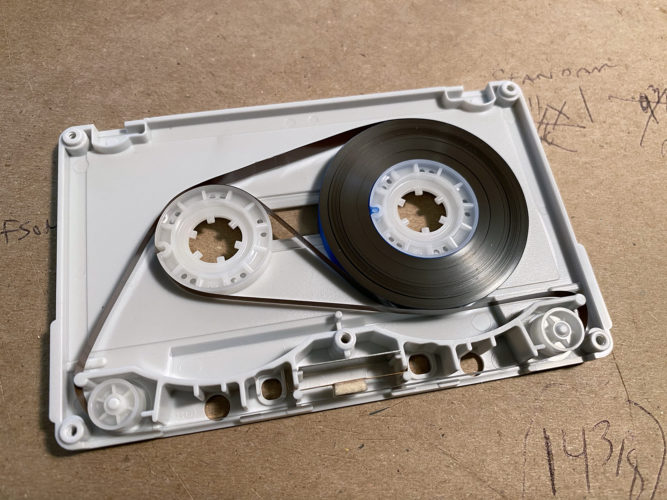
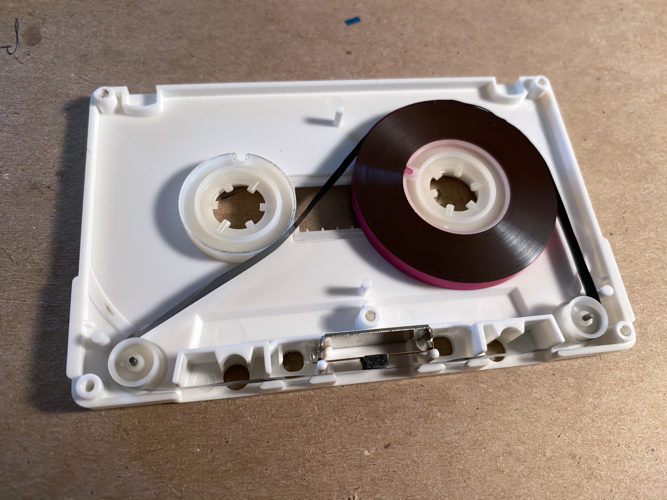
Unscrew the five screws holding the tape case together and pull the tape apart. Save the screws. I use the cassette’s Norelco hard case to store the loose parts as I tear it apart.
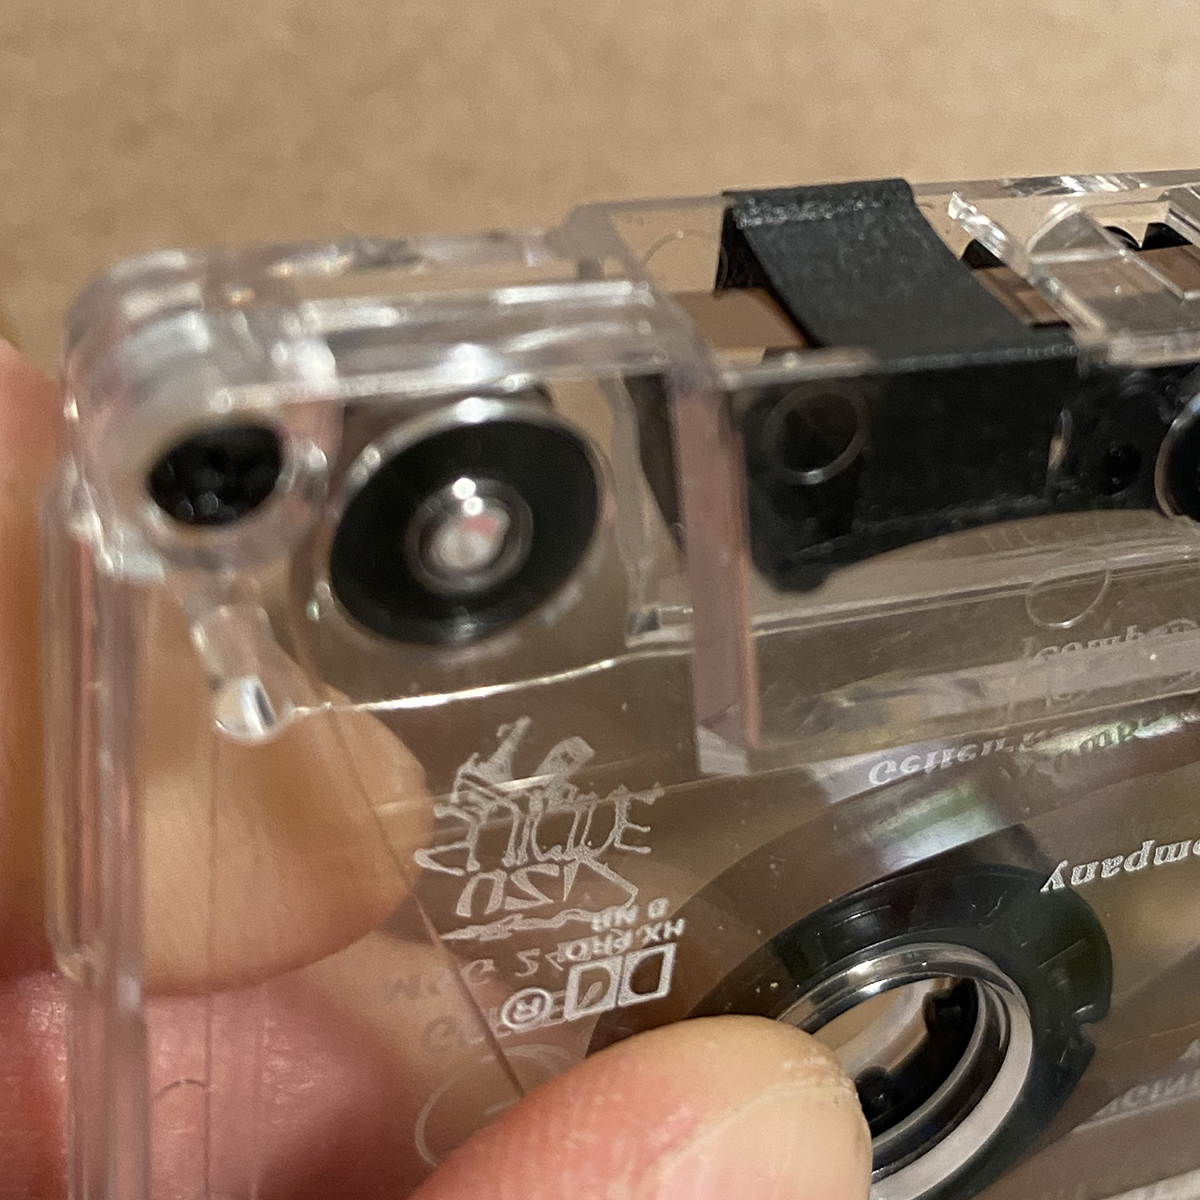
If you encounter this type of wheel, slice the tape off where the tape meets the rolling surface. You DO NOT want to pop that sucker out.
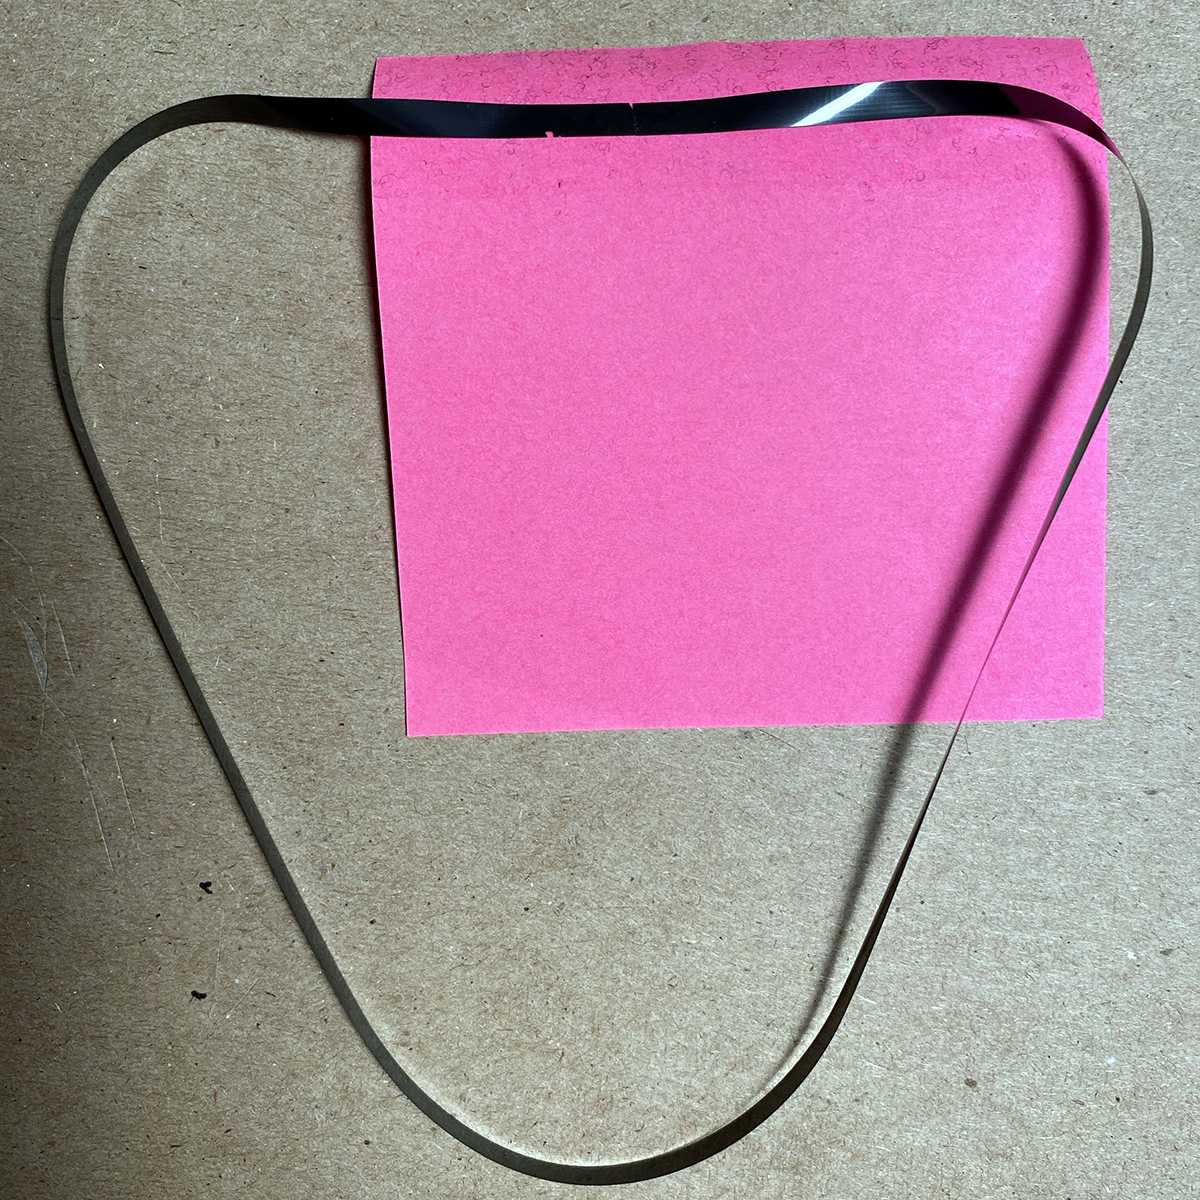
Remove the wheels and separate the tape from the wheels. Save the long spool of tape, as this will be the source for making your section of loop. You can use the tip of your X-ACTO® blade to push out the rubber cylinder keeping the tape leader in place OR if you have the kind where the tape runs underneath a section, simply slice the tape off where the tape meets the wheel. (Note: Assembling this type, after popping them off is annoying and you don’t want to deal with that.) I keep the plastic or light paper non-slip inserts on opaque shells, but I prefer the look of the clear cases without them. Some designs may play better with them left in.
Measure and cut your loop to the specified length, based on the selected design. Make sure the ends match one another. I cut them straight 90 degree angle, others prefer to cut them at 45 degrees.
Use a Post-it note to align your loop tape ends. Make sure to dull the sticky surface on your pant leg first, otherwise it will pull off the magenetic coating.
Dull the stickiness of your Post-it® note on your pants until you feel it’s still tacky, but won’t pull the magnetic surface coating off of your tape.
Stick one end of your tape to your Post-it® so it stays in position, while you match up the second side. Be sure that the natural curve of the tape curves inward.
Cut a small piece of transparent scotch tape, just about the width of your tape, and then however long. Using the short side, apply the adhesive tape on the ends of the two ends of cassette tape. Slice the excess tape off, making sure to cut as close as possible, without cutting the tape itself.
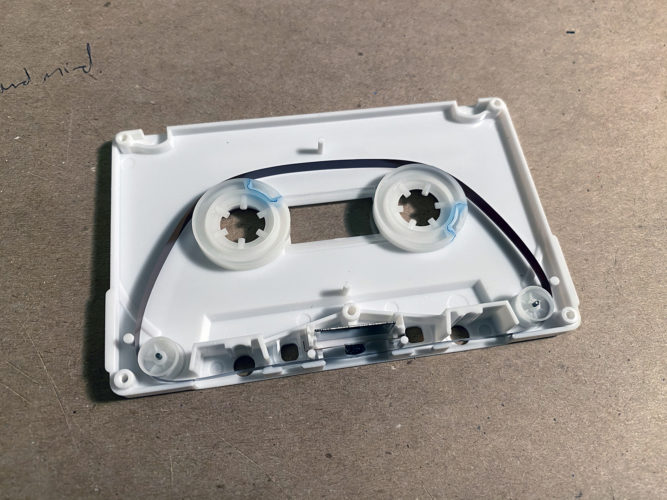
Wind the tape onto the rollers, according to the selected design. I’ve found that working left-to-right or right-to left, and back-to-front is a good way to start. For designs with many rollers, you may want to work from back-to-front while using the loose tape cover to lightly cover the rollers that are completed and work towards yourself. This helps keep the tape in place while you make the many twists and turns in complex designs. I’ll use the fine tip of the X-ACTO® blade to guide the tape while holding tape in place with the other hand.
Reassemble the cassette shell. Use the X-ACTO® blade to guide the tape in the exposed bottom portion if the shell. The tapes can be somewhat slack and they might need a little coaxing as you close the shell. Insert and tighten the five screws.
Test the tape. Play the tape in a cassette deck to be sure the loop plays all the way through. If the loop has jammed, it may be too loose or too tight. Remove the screws and adjust the layout of the tape. I find that you sometimes need to move the tape in front or behind those extra little plastic columns inside the cassette shell’s mold, if you have them. If your tape is too long, remove it, find the seam and remove the extra length from that section. Re-tape and reassemble the tape. Test to see if it plays freely. I test both sides, sometimes the tape doesn’t move freely on both sides. I’ll label the working sides of cassettes so I know how they behave when I’m working with them. If your tape is too short, remove the tape and cut a single slice and measure the length. Determine how much longer you’d like to make it and cut a new piece. Once you find a size that works, write it down.
After you’ve tested your tape and it’s working to your satisfaction. If you’re re-using a commercial cassette, place masking tape on the record notches so you can record over the tape. Consumer blanks come with these notches intact.
Troubleshooting
If you’re using extra rollers or wheels and glueing them, you may need to scrape off the small portions if you applied a little too much. Glue buildup can cause unnecessary friction causing the tape to seize.
Double-check that the tape isn’t pinched anywhere along the bottom.
How long should I cut the length of cassette?
Cassettes run at 1.875 inches per second. If a design you’re copying lists how many seconds the loop is, start there. You may have to cut 2-3 loops before you find the length that gives you the best tension. You don’t want it too snug, but you don’t want it loose either.
When I record loops, they all have an empty gap at the end of the loop
Here’s my black masking tape “band-aid” which blocks the erase head, allowing for sound on sound recording.
In order to create gapless loops, you’ll need to block the erase head from erasing prior to recording. This allows you to do a “sound on sound” recording technique, resulting in gapless playback. I’ve read that some folks cover the erase head with aluminum foil. Instead, I chose to create a three-layer masking tape “band aid” of sorts. Basically, stick three small pieces of masking tape on top of one another sticky side down, then cut a thin strip, the width of the erase head and place it’s sticky side onto the sticky side of the three layers you just made. Cut it down to size and place it onto the tape, pushing it slightly into the tape. Be sure there is no adhesive except for what is sticking to the sides of the shell. The tape should move freely.
Here’s Hainbach’s explanation of sound on sound recording:
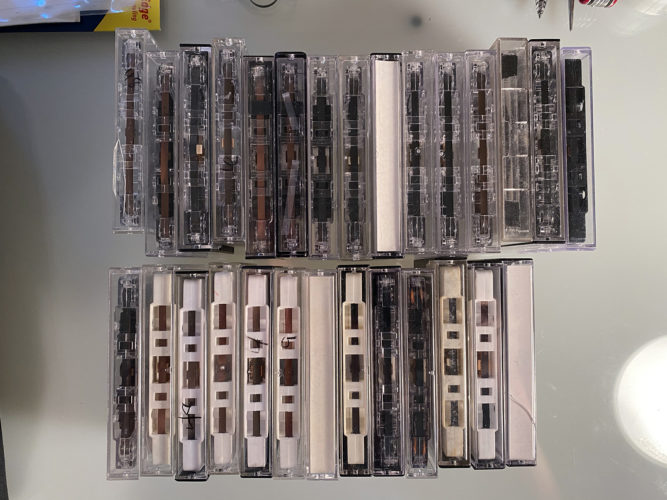
Check out some images from my crash course in tape surgery!
I made about 34 endless looping tapes in about a week. I scoured the area thrift stores for tapes with screws on lunch hours (and scored a portable cassette recorder still in the box too!) I found the Chandler Loop design to be the easiest and fastest to make clocking at 8 seconds. The “Of Sound Mind” Chandler Loop variant was easy to build, and yields a whopping 10.8 seconds of loop time. Some of the 7 or 8 roller designs were more time consuming, but I was able to get about 12 seconds of loop. Not bad, for a few dollars’ investment.
Now you've made some tapes, but what can you do with them?
These videos demonstrate how you can to use tape loops with cassette 4-track recorders in creative ways, essentially playing an old Portastudio like an instrument, while also giving your work some lo-fi tape vibes. These folks show the viewer how to play chords, chord progressions and even full song stems.
Reference Resources & Further Reading
Here are some helpful websites I found while researching how to make cassette loops and the different modified designs others have done to maximize the runtime of your looping tape.
Keeping creative projects like this alive takes time, coffee, and a steady supply of sacrificial cassettes. If you learned something here (or just saved yourself a little trial and error), consider tossing a few bucks in the tip jar — it helps keep the experiments, repairs, and tutorials coming. (-‿-)ゞ
This is absolutely amazing. I work with tape loops in my installations, sculptures, and audio productions. I’m always trying to find new ways to extend loop times and manipulate the physical tape for different effects. Now that I’ve found this amazing documentation, I feel as though I have been re-inventing the wheel! Thank you so much for sharing this!
Wow and thanks for your help. This is amazingly good for me who are to try tape looping for the first time. I am really thankful for this turorial and inspiration.
Sometime in the future I will hopefully release some tape loop music. Right now I am doing harsh noise under the name All Them Demons on bandcamp.
Hi This article is great. I just sat down to build a new tape and the Marc Fisher loop in your diagram has the wrong measurements on it. It looks like they are the same as the loop above it in the diagram. I’ll figure it out but as it is published right now it is several inches too short. My guess is that this loop will be somewhere between 22 and 22 3/4 inches, but I’ve run out of time today and will have to try again another day. If you’ve built this one and have a good measurement please let me know. Thanks!!
Hi Scott. Thanks for the feedback. It’s much appreciated. Looking at the diagram, you’re probably right. I’ve been considering revisiting this post with some updates. If I do revisit, I’ll have a look at this loop in particular and update the graphic. I’ve been pretty much sticking to the Chandler Loop since it requires no additional parts or gluing. It’s quick and easy, as compared to the others.
Hi Scott! Just following up to let you know I finally got around to creating a Marc Fisher loop and confirmed that ~22.75″ is the proper length. (578mm for those using the metric system.) It results in a ~0:12 second loop at normal speed. I’ve updated the image and the downloadable PDF. Thanks for letting me know my measurements were wrong so I could fix it.
Hey all! Marty here. I’ve been meaning to update this post with some additional information regarding the actual splicing of tape. Rather than relying on a low-tech Post-It note, you may want to try picking up a splicer block. I found a Cassette Tape Splicer Block on eBay, and it’s made splicing tape way more accurate and efficient. You’ll also need some splicing tape.
thanks so much for this guide. quick question, do you know of any place online to buy spare wheels and (especially) rollers? harvesting them from old tapes is really slow/time-consuming, would prefer to buy in bulk if anyone knows where that could be done.
Hi Luke! Sorry for the late response. Been super busy and just checked the comments on this post. Anyways, yeah.. when I need extra wheels/spindles, I generally just crack open a bunch of thrift store tapes to harvest them. I find that if you end up with a bunch of tapes without screws, those are the best candidates, because you’re not going to re-use the shells.
When i was looking for bulk wheels/spindles, I remember seeing some folks that make and sell custom tapes on Etsy using colorful plastic. I was at a local Target store, and found these things called “fuse beads” which are the perfect width to fit within tapes. I used those, with some luck.. but eventually just started making tapes that required no extra parts for the simplicity. If you do try this method, please report back and let me know if it worked for you. Or, if you found another solution, add to this thread for everyone else. Again, sorry for the delayed response.
I have been making tape loops for a few years now and this is a super valuable resource you have created. I wish I could have found all of this information in one place a few years ago, but I am happy it is here now for anyone learning now or in the future!
Your site and documenting illustrations are absolutely amazing. I am multi-disciplined creator in NY, returned to working with tape in 2018 for a release then at beginning of the pandemic started making loops. Stepped away for a bit but recently returned. Currently using them with some DIY modular electronics that I’m also into. I will follow your YT/IG trails. Thanks for your passion in documenting your process and sharing with the planet!
Thanks Jim! You should check out MothHunterMods. Trevor does some wild stuff with tape machines and CV which might be useful to bridge the gap between modular and the tape world. Thanks for the kind words!
Thanks for posting such a comprehensive source on cassette looping and annotating your sources! I’m glad to see my cassette looping research get picked up and carried so far in the last 28 years! The 200 loop-cassettes I sold through record stores in 1995 ($2/ea to distributors) are what led to what to that ‘Chandler loop’ name and measurements. Musicians used to contact me about them a lot before google appeared and pointed to that Thumb zine interview transcribed online. I’d published the ideal tape lengths of 235mm and 372mm on the cassette loops’ J-cards in a spirit of fair use (this was pre-“open source” days) https://www.discogs.com/release/983688-Mr-Pharmacist-The-NTSC-Loops-1-99
Whoa! David! Thank you for sharing your knowledge with the world. Your loop is my absolute “go to”. It’s quick and efficient, as it requires no additional parts. I had no idea that you wholesaled loop tapes in the 90s! That’s wild. Thank you for the Discogs link. It really helps flesh out some background on the origin of the “Chandler Loop”.


This is absolutely amazing. I work with tape loops in my installations, sculptures, and audio productions. I’m always trying to find new ways to extend loop times and manipulate the physical tape for different effects. Now that I’ve found this amazing documentation, I feel as though I have been re-inventing the wheel! Thank you so much for sharing this!
IG: @matchzimmerman
Hi
Wow and thanks for your help. This is amazingly good for me who are to try tape looping for the first time.
I am really thankful for this turorial and inspiration.
Sometime in the future I will hopefully release some tape loop music.
Right now I am doing harsh noise under the name All Them Demons on bandcamp.
All the best!
Hi This article is great. I just sat down to build a new tape and the Marc Fisher loop in your diagram has the wrong measurements on it. It looks like they are the same as the loop above it in the diagram. I’ll figure it out but as it is published right now it is several inches too short. My guess is that this loop will be somewhere between 22 and 22 3/4 inches, but I’ve run out of time today and will have to try again another day. If you’ve built this one and have a good measurement please let me know. Thanks!!
Hi Scott. Thanks for the feedback. It’s much appreciated. Looking at the diagram, you’re probably right. I’ve been considering revisiting this post with some updates. If I do revisit, I’ll have a look at this loop in particular and update the graphic. I’ve been pretty much sticking to the Chandler Loop since it requires no additional parts or gluing. It’s quick and easy, as compared to the others.
Hi Scott! Just following up to let you know I finally got around to creating a Marc Fisher loop and confirmed that ~22.75″ is the proper length. (578mm for those using the metric system.) It results in a ~0:12 second loop at normal speed. I’ve updated the image and the downloadable PDF. Thanks for letting me know my measurements were wrong so I could fix it.
Hey all! Marty here. I’ve been meaning to update this post with some additional information regarding the actual splicing of tape. Rather than relying on a low-tech Post-It note, you may want to try picking up a splicer block. I found a Cassette Tape Splicer Block on eBay, and it’s made splicing tape way more accurate and efficient. You’ll also need some splicing tape.
thanks so much for this guide. quick question, do you know of any place online to buy spare wheels and (especially) rollers? harvesting them from old tapes is really slow/time-consuming, would prefer to buy in bulk if anyone knows where that could be done.
cheers
Hi Luke! Sorry for the late response. Been super busy and just checked the comments on this post. Anyways, yeah.. when I need extra wheels/spindles, I generally just crack open a bunch of thrift store tapes to harvest them. I find that if you end up with a bunch of tapes without screws, those are the best candidates, because you’re not going to re-use the shells.
When i was looking for bulk wheels/spindles, I remember seeing some folks that make and sell custom tapes on Etsy using colorful plastic. I was at a local Target store, and found these things called “fuse beads” which are the perfect width to fit within tapes. I used those, with some luck.. but eventually just started making tapes that required no extra parts for the simplicity. If you do try this method, please report back and let me know if it worked for you. Or, if you found another solution, add to this thread for everyone else. Again, sorry for the delayed response.
I have been making tape loops for a few years now and this is a super valuable resource you have created. I wish I could have found all of this information in one place a few years ago, but I am happy it is here now for anyone learning now or in the future!
Your site and documenting illustrations are absolutely amazing. I am multi-disciplined creator in NY, returned to working with tape in 2018 for a release then at beginning of the pandemic started making loops. Stepped away for a bit but recently returned. Currently using them with some DIY modular electronics that I’m also into. I will follow your YT/IG trails. Thanks for your passion in documenting your process and sharing with the planet!
Regards in the Loop
Jim
Thanks Jim! You should check out MothHunterMods. Trevor does some wild stuff with tape machines and CV which might be useful to bridge the gap between modular and the tape world. Thanks for the kind words!
Thanks for posting such a comprehensive source on cassette looping and annotating your sources!
I’m glad to see my cassette looping research get picked up and carried so far in the last 28 years!
The 200 loop-cassettes I sold through record stores in 1995 ($2/ea to distributors) are what led to what to that ‘Chandler loop’ name and measurements. Musicians used to contact me about them a lot before google appeared and pointed to that Thumb zine interview transcribed online.
I’d published the ideal tape lengths of 235mm and 372mm on the cassette loops’ J-cards in a spirit of fair use (this was pre-“open source” days)
https://www.discogs.com/release/983688-Mr-Pharmacist-The-NTSC-Loops-1-99
Whoa! David! Thank you for sharing your knowledge with the world. Your loop is my absolute “go to”. It’s quick and efficient, as it requires no additional parts. I had no idea that you wholesaled loop tapes in the 90s! That’s wild. Thank you for the Discogs link. It really helps flesh out some background on the origin of the “Chandler Loop”.